云运维笔记(5) Kubernetes GPU 支持与驱动安装
- 1. 安装 GPU 驱动
- 2. 安装 nvidia-container-runtime
- 3. Docker 引擎设置
- 4. Kubernetes 引擎支持 GPU 设置
- 安装 container-runtime
- 5. 参考
- 6. .6. 关于作者
1. 安装 GPU 驱动
1.1. 查看 GPU 硬件
# 安装lspci命令

yum install -y pciutils

# 查看 nvidia GPU
lspci | grep -i nvidia
1.2. 检查自带 GPU 驱动
系统自带的 GPU 驱动需要关闭,否则会冲突。
lsmod | grep nouveau
# 如果有结果,则说明存在nouveau。没有则直接跳过这一步。

# 如果出现信息则说明系统自带的 GPU 驱动没有被禁止掉。

# 新建文件
touch /etc/modprobe.d/blacklist-nouveau.conf

# 然后添加如下内容:
blacklist nouveau
options nouveau modeset=0

# 方法一:临时生效,重启无效
modprobe -r nouveau

# 方法二:重启系统
reboot
1.3. .1.3. 官方下载 GPU 驱动
官方地址:https://www.nvidia.cn/Download/index.aspx?lang=cn
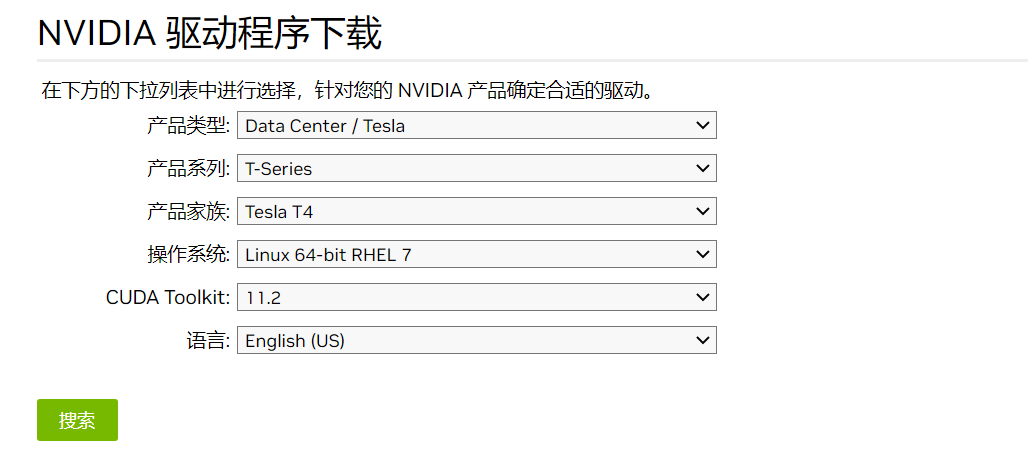
- 产品系列,产品家族可以通过
lspci | grep -i nvidia命令查看。 - 操作系统:可以通过
cat /etc/os-release命令查看。 - CUDA Toolkit 版本可以根据算法需要求而定。
- 语言:英语
注意:
- 如果选择 Linux 64 具体发行版本,如 RHEL7 则下载文件为 rpm 格式的。
- 如果选择 Linux 64 非具体发行版本,则下载文件为 .run 格式的。(推荐)
1.4. 卸载驱动
CentOS7
# 使用安装包卸载
sudo /path/to/NVIDIA-Linux-x86_64-xxx.xx.run --uninstall


# 使用 yum 卸载
sudo yum remove nvidia* -y
sudo yum remove cuda* -y
sudo yum remove "*nvidia*" -y

# 删除文件
sudo rm -rf /usr/local/cuda*
sudo rm -rf /usr/lib/nvidia*
sudo rm -rf /usr/lib64/nvidia*
sudo rm -rf /etc/X11/xorg.conf

# 刷新
sudo yum autoremove
sudo yum autoclean

# 重启机器
reboot
1.5. 安装 GPU 驱动
- CUDA 11.2
- OS: Linux 64
- GPU: Tesla T4
驱动名称:NVIDIA-Linux-x86_64-460.32.03.run
sh NVIDIA-Linux-x86_64-460.32.03.run -no-x-check -no-nouveau-check -no-opengl-files
参数说明:
-no-x-check表示安装驱动时不检查X服务,非必需-no-nouveau-check表示安装驱动时不检查nouveau,非必需-no-opengl-files表示只安装驱动文件,不安装OpenGL文件
1.6. 安装失败
1.6.1. ERROR: An NVIDIA kernel module ’nvidia-uvm’ appears to already be loaded in your kernel
错误:您的内核中似乎已经加载了NVIDIA内核模块。说明你的 nvidia 驱动已经安装过。
ERROR: An NVIDIA kernel module 'nvidia-uvm' appears to already be loaded in your kernel.  This may be because it is in use (for example, by an X server, a CUDA
         program, or the NVIDIA Persistence Daemon), but this may also happen if your kernel was configured without support for module unloading.  Please be sure to exit
         any programs that may be using the GPU(s) before attempting to upgrade your driver.  If no GPU-based programs are running, you know that your kernel supports
         module unloading, and you still receive this message, then an error may have occurred that has corrupted an NVIDIA kernel module's usage count, for which the
         simplest remedy is to reboot your computer.
1.6.2. ERROR: Unable to find the kernel source tree for the currently running kernel
错误:无法找到当前运行的内核的内核源代码树,说明你的内核有点问题。
ERROR: Unable to find the kernel source tree for the currently running kernel.  Please make sure you have installed the kernel source files for your kernel and that
         they are properly configured; on Red Hat Linux systems, for example, be sure you have the 'kernel-source' or 'kernel-devel' RPM installed.  If you know the
         correct kernel source files are installed, you may specify the kernel source path with the '--kernel-source-path' command line option.
- 思路一:检查内核版本是否一致
-> # cat /proc/version
Linux version 3.10.0-957.el7.x86_64 (mockbuild@kbuilder.bsys.centos.org) (gcc version 4.8.5 20150623 (Red Hat 4.8.5-36) (GCC) ) #1 SMP Thu Nov 8 23:39:32 UTC 2018

-> # rpm -qa |grep kernel
kernel-tools-libs-3.10.0-1160.66.1.el7.x86_64
kernel-tools-3.10.0-1160.66.1.el7.x86_64

# 当前运行是 3.10.0-957.el7 与 rpm 安装列表里的版本不一致。
再查看内核目录:
-> # ll /usr/lib/modules/3.10.0-957.el7.x86_64
total 0
drwxr-xr-x 2 root root 6 Nov 21 10:52 video
-> # ll /usr/src/kernels
total 0
当前加载运行的内核版本: 3.10.0-957.el7.x86_64,而安装列表上只有 3.10.0-1160.66.1.el7.x86_64 版本,说明存在两套不同版本的内核,而且实际目录下的内核文件也不完整。比较混乱。我们需要重新安装一套运行的内核:3.10.0-957.el7.x86_64。其它版本的内核全部卸载掉。
1.7. 重装内核:方法一
从 CentOS 官方找到对应版本的内核安装文件:https://buildlogs.centos.org/c7.1810.00.x86_64/kernel/20181030130226/3.10.0-957.el7.x86_64/
- kernel
- kernel-devel 用于内核开发所需的内核头文件以及Makefile
- kernel-headers 有统领内核的作用
例 version: 3.10.0-957:
- kernel-3.10.0-957.el7.x86_64.rpm
- kernel-devel-3.10.0-957.el7.x86_64.rpm
- kernel-headers-3.10.0-957.el7.x86_64.rpm
参考下载链接:
- https://buildlogs.centos.org/c7.1810.00.x86_64/kernel/20181030130226/3.10.0-957.el7.x86_64/kernel-3.10.0-957.el7.x86_64.rpm
- https://buildlogs.centos.org/c7.1810.00.x86_64/kernel/20181030130226/3.10.0-957.el7.x86_64/kernel-devel-3.10.0-957.el7.x86_64.rpm
- https://buildlogs.centos.org/c7.1810.00.x86_64/kernel/20181030130226/3.10.0-957.el7.x86_64/kernel-tools-3.10.0-957.el7.x86_64.rpm
- https://buildlogs.centos.org/c7.1810.00.x86_64/kernel/20181030130226/3.10.0-957.el7.x86_64/python-perf-3.10.0-957.el7.x86_64.rpm
- https://buildlogs.centos.org/c7.1810.00.x86_64/kernel/20181030130226/3.10.0-957.el7.x86_64/kernel-headers-3.10.0-957.el7.x86_64.rpm
下载不同的内核版本:
- kernel-3.10.0-1160 版本
rpm 安装 kernel, kernel-devel, kernel-headers:
-> # rpm -ivh kernel-3.10.0-957.el7.x86_64.rpm kernel-devel-3.10.0-957.el7.x86_64.rpm kernel-headers-3.10.0-957.el7.x86_64.rpm
Preparing...                          ################################# [100%]
Updating / installing...
   1:kernel-headers-3.10.0-957.el7    ################################# [ 33%]
   2:kernel-devel-3.10.0-957.el7      ################################# [ 67%]
   3:kernel-3.10.0-957.el7            ################################# [100%]
查看内核文件:
# 查看安装情况
-> # rpm -qa |grep kernel
kernel-devel-3.10.0-957.el7.x86_64
kernel-headers-3.10.0-957.el7.x86_64
kernel-3.10.0-957.el7.x86_64
# 查看内核文件
-> # ll /usr/src/kernels
total 4.0K
drwxr-xr-x 22 root root 4.0K Nov 22 09:33 3.10.0-957.el7.x86_64
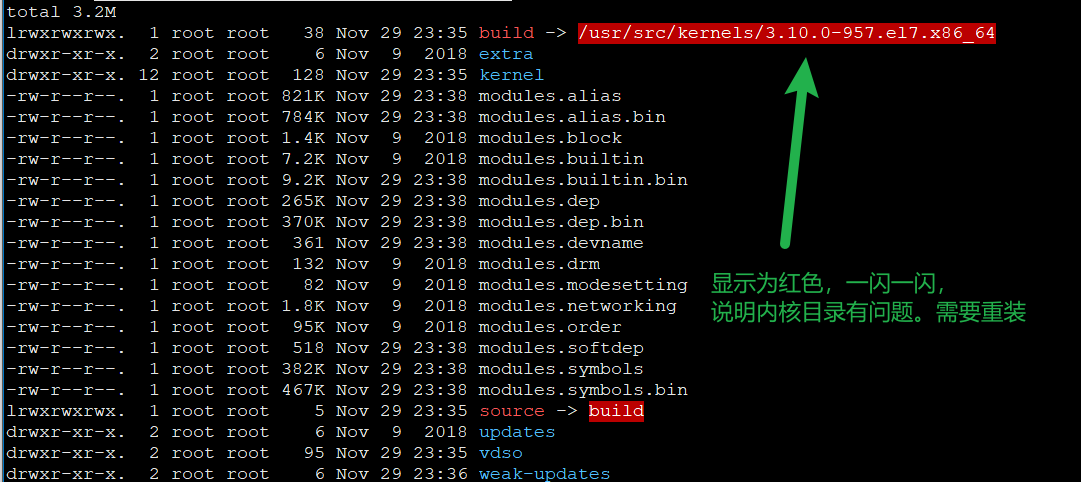
# 查看内核模块情况
-> # ll /usr/lib/modules/3.10.0-957.el7.x86_64
total 3.2M
lrwxrwxrwx 1 root root 38 Nov 22 09:33 build -> /usr/src/kernels/3.10.0-957.el7.x86_64
drwxr-xr-x 2 root root 6 Nov 9 2018 extra
drwxr-xr-x 12 root root 128 Nov 22 09:33 kernel
-rw-r--r-- 1 root root 821K Nov 22 09:33 modules.alias
-rw-r--r-- 1 root root 784K Nov 22 09:33 modules.alias.bin
-rw-r--r-- 1 root root 1.4K Nov 9 2018 modules.block
-rw-r--r-- 1 root root 7.2K Nov 9 2018 modules.builtin
-rw-r--r-- 1 root root 9.2K Nov 22 09:33 modules.builtin.bin
-rw-r--r-- 1 root root 265K Nov 22 09:33 modules.dep
-rw-r--r-- 1 root root 370K Nov 22 09:33 modules.dep.bin
-rw-r--r-- 1 root root 361 Nov 22 09:33 modules.devname
-rw-r--r-- 1 root root 132 Nov 9 2018 modules.drm
-rw-r--r-- 1 root root 82 Nov 9 2018 modules.modesetting
-rw-r--r-- 1 root root 1.8K Nov 9 2018 modules.networking
-rw-r--r-- 1 root root 95K Nov 9 2018 modules.order
-rw-r--r-- 1 root root 518 Nov 22 09:33 modules.softdep
-rw-r--r-- 1 root root 382K Nov 22 09:33 modules.symbols
-rw-r--r-- 1 root root 467K Nov 22 09:33 modules.symbols.bin
lrwxrwxrwx 1 root root 5 Nov 22 09:33 source -> build
drwxr-xr-x 2 root root 6 Nov 9 2018 updates
drwxr-xr-x 2 root root 95 Nov 22 09:33 vdso
drwxr-xr-x 2 root root 6 Nov 21 10:52 video
drwxr-xr-x 2 root root 6 Nov 9 2018 weak-updates
1.8. 重装内核:方法二
# 查看当前内核版本
uname -r
3.10.0-1160.105.1.el7.x86_64

# 查看Linux 内核模块的位置,如果显着红色,说明内核文件不存,需要重装
ls -l /usr/lib/modules/

# 搜索一下非 160.105 版本
rpm -qa |grep kernel |grep -v 160.105

# 将上面的存在版本删除掉
rpm -qa |grep kernel |grep -v 160.105|xargs rpm -evh

yum install kernel kernel-devel kernel-header
1.9. 设置默认内核
查看系统所有的内核:
-> #  sudo awk -F\' '$1=="menuentry " {print i++ " : " $2}' /etc/grub2.cfg
0 : CentOS Linux (3.10.0-957.el7.x86_64) 7 (Core)
1 : CentOS Linux (0-rescue-xxxx) 7 (Core)
设置默认内核版本:
方法一:grub2-set-default 0
方法二:
编辑 /etc/default/grub 文件
设置 GRUB_DEFAULT=0,通过上面查询显示的编号为 0 的内核作为默认内核:
生成 grub 配置文件并重启:
-> # grub2-mkconfig -o /boot/grub2/grub.cfg
Generating grub configuration file ...
Found linux image: /boot/vmlinuz-3.10.0-957.el7.x86_64
Found initrd image: /boot/initramfs-3.10.0-957.el7.x86_64.img
Found linux image: /boot/vmlinuz-0-rescue-542ec60730c042d18738ae243747e2e0
Found initrd image: /boot/initramfs-0-rescue-542ec60730c042d18738ae243747e2e0.img
done

reboot
1.10. 再次安装 GPU 驱动包
1.10.1. 先卸载之前的驱动
sh NVIDIA-Linux-x86_64-460.32.03.run --uninstall
1.10.2. 安装 .run 文件
参数说明:
- -no-x-check表示安装驱动时不检查X服务,非必需
- -no-nouveau-check 表示安装驱动时不检查nouveau,非必需
- -no-opengl-files 表示只安装驱动文件,不安装OpenGL文件
# 驱动名称:NVIDIA-Linux-x86_64-460.32.03.run
sh NVIDIA-Linux-x86_64-460.32.03.run -no-x-check -no-nouveau-check -no-opengl-files
1.10.3. 安装 .rpm 文件
i) `rpm -i nvidia-driver-local-repo-rhel7-460.106.00-1.0-1.x86_64.rpm'
ii) `yum clean all`
iii) `yum install cuda-drivers`
iv) `reboot`
2. 安装 nvidia-container-runtime
2.1. 作用
nvidia-container-runtime主要用于将容器runC spec作为输入,然后将nvidia-container-toolkit脚本作为一个prestart hook注入到runC spec中,将修改后的runC spec交给runC处理。
2.2. 安装
# nvidia-container-runtime
## 添加源
distribution=$(. /etc/os-release;echo $ID$VERSION_ID)
curl -s -L https://nvidia.github.io/nvidia-container-runtime/$distribution/nvidia-container-runtime.repo | \
sudo tee /etc/yum.repos.d/nvidia-container-runtime.repo

# CentOS
sudo yum -y install nvidia-container-runtime

# Ubuntu
sudo apt-get install nvidia-container-runtime
3. Docker 引擎设置
让 Docker 引擎能识别 GPU 驱动。以下提供两种设置方式。
3.1. 系统插入文件
sudo mkdir -p /etc/systemd/system/docker.service.d
sudo tee /etc/systemd/system/docker.service.d/override.conf <<EOF
[Service]
ExecStart=
ExecStart=/usr/bin/dockerd --host=fd:// --add-runtime=nvidia=/usr/bin/nvidia-container-runtime
EOF
sudo systemctl daemon-reload
sudo systemctl restart docker
3.2. Daemon配置文件
sudo tee /etc/docker/daemon.json <<EOF
{
    "default-runtime": "nvidia",
    "runtimes": {
        "nvidia": {
            "path": "/usr/bin/nvidia-container-runtime",
            "runtimeArgs": []
        }
    }
}
EOF
sudo pkill -SIGHUP dockerd
4. Kubernetes 引擎支持 GPU 设置
安装 container-runtime
Installing the NVIDIA Container Toolkit 参考:https://docs.nvidia.com/datacenter/cloud-native/container-toolkit/latest/install-guide.html
# CentOS7 为例,更多点击URL
curl -s -L https://nvidia.github.io/libnvidia-container/stable/rpm/nvidia-container-toolkit.repo | \
  sudo tee /etc/yum.repos.d/nvidia-container-toolkit.repo

sudo yum-config-manager --enable nvidia-container-toolkit-experimental

sudo yum install -y nvidia-container-toolkit
kubectl create -f https://raw.githubusercontent.com/NVIDIA/k8s-device-plugin/v0.12.3/nvidia-device-plugin.yml
以上直接安装的话,全在所有的 NODE 节点安装,可能我们的集群并非全是GPU机器,最好添加一个标签来选择安装节点。
# Copyright (c) 2019, NVIDIA CORPORATION.  All rights reserved.
#
# Licensed under the Apache License, Version 2.0 (the "License");
# you may not use this file except in compliance with the License.
# You may obtain a copy of the License at
#
#     http://www.apache.org/licenses/LICENSE-2.0
#
# Unless required by applicable law or agreed to in writing, software
# distributed under the License is distributed on an "AS IS" BASIS,
# WITHOUT WARRANTIES OR CONDITIONS OF ANY KIND, either express or implied.
# See the License for the specific language governing permissions and
# limitations under the License.

apiVersion: apps/v1
kind: DaemonSet
metadata:
  name: nvidia-device-plugin-daemonset
  namespace: kube-system
spec:
  selector:
    matchLabels:
      name: nvidia-device-plugin-ds
  updateStrategy:
    type: RollingUpdate
  template:
    metadata:
      labels:
        name: nvidia-device-plugin-ds
    spec:
        nodeSelector:     # 新增行
        node-type: gpu  # 新增行
      tolerations:
      - key: nvidia.com/gpu
        operator: Exists
        effect: NoSchedule
      # Mark this pod as a critical add-on; when enabled, the critical add-on
      # scheduler reserves resources for critical add-on pods so that they can
      # be rescheduled after a failure.
      # See https://kubernetes.io/docs/tasks/administer-cluster/guaranteed-scheduling-critical-addon-pods/
      priorityClassName: "system-node-critical"
      containers:
      - image: nvcr.io/nvidia/k8s-device-plugin:v0.12.3
        name: nvidia-device-plugin-ctr
        env:
          - name: FAIL_ON_INIT_ERROR
            value: "false"
        securityContext:
          allowPrivilegeEscalation: false
          capabilities:
            drop: ["ALL"]
        volumeMounts:
          - name: device-plugin
            mountPath: /var/lib/kubelet/device-plugins
      volumes:
        - name: device-plugin
          hostPath:
            path: /var/lib/kubelet/device-plugins
5. 参考
- https://support.huawei.com/enterprise/zh/doc/EDOC1100128448/4338a2ae
- https://www.nvidia.cn/Download/index.aspx?lang=cn
- https://github.com/NVIDIA/nvidia-container-runtime
- https://github.com/NVIDIA/k8s-device-plugin
6. .6. 关于作者
我的博客:https://yezihack.github.io
欢迎关注我的微信公众号【空树之空】,一日不学则面目可憎也,吾学也。